شبیه سازی های درایو های الکتریکی
در این وبلاگ می توانید شبیه سازی درایو های الکتریکی را دریافت نماییدشبیه سازی های درایو های الکتریکی
در این وبلاگ می توانید شبیه سازی درایو های الکتریکی را دریافت نمایید24 آموزش راه اندازی سنسور VL53L0X
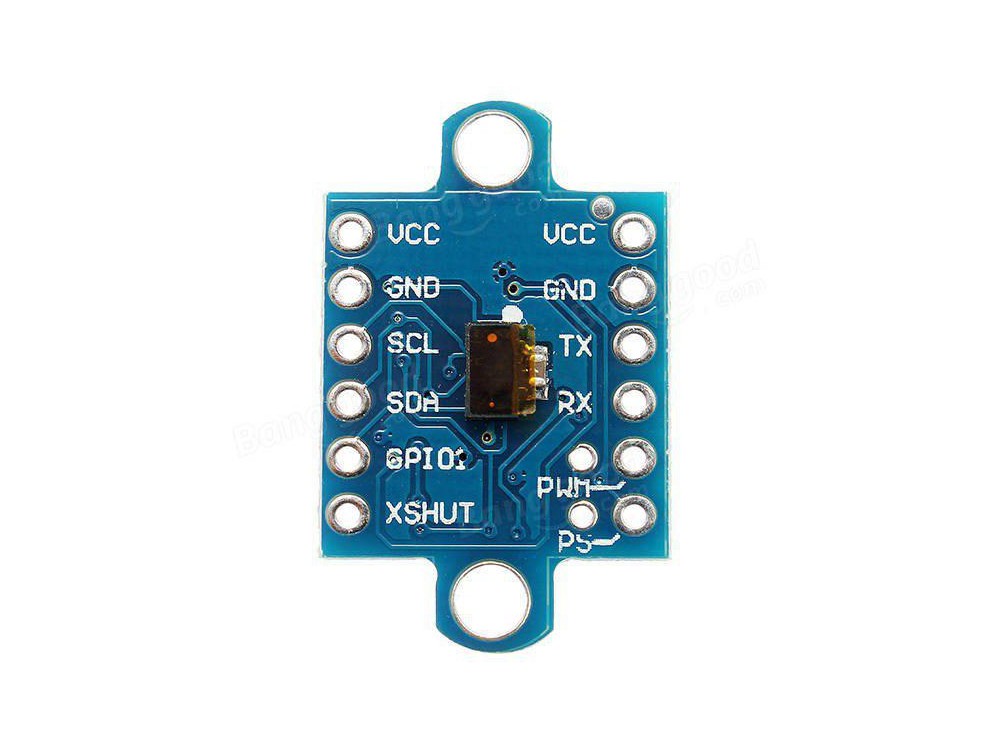
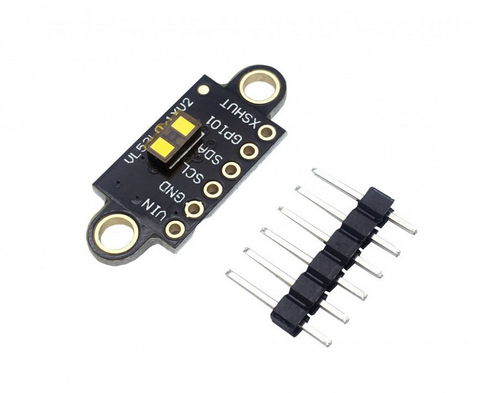
این سنسور در دو مدل تولید می شود :
مدل اول دارای پین های ارسال دیتا از دو طریق سریال و i2c می باشد.
مدل دوم فقط از طریق i2c ارسال دیتا دارد.
ماژول متر لیزری VL53L0X با پرتاب اشعه مادون قرمز و دریافت این امواج پس از برخورد با اجسام ، از طریق محاسبه مدت زمان رفت و برگشت اشعه فاصله را اندازه گیری می کند. این ماژول توانایی اندازه گیری تا فاصله ۲ متر با دقت ۱ میلیمتر در شرایط مطلوب را دارد. ولتاژ کاری این ماژول ۲٫۶ تا ۵٫۵ ولت بوده واز طریق پروتکل I2C با میکروکنترلر ها ارتباط برقرار می کند.
شرح پایه های ماژول:
- پایه GND زمین
- پایه VCC تغذیه مثبت
- پایه SCL و SDA ارتباط I2C
- پایه XSHUT مربوط به Enable ماژول
Description:
The VL53L0X uses ST’s FlightSense technology to precisely measure how long it takes for emitted pulses of infrared laser light to reach the nearest object and to be reflected back to a detector. It can be considered a tiny, self-contained lidar system. This time-of-flight (TOF) measurement enables it to accurately determine the absolute distance to a target without the object’s reflectance influencing the measurement. The sensor can report distances of up to 2 m (6.6 ft) with 1 mm resolution, but its effective range and accuracy (noise) depend heavily on ambient conditions and target characteristics like reflectance and size, as well as the sensor configuration (the sensor’s accuracy is specified to range from ±۳% at best to over ±۱۰% in less optimal conditions).
Ranging measurements are available through the sensor’s I⊃۲;C (TWI) interface, which is also used to configure sensor settings, and the sensor provides two additional pins: a shutdown input and an interrupt output.
The VL53L0X is a great IC, but its small, leadless, LGA package makes it difficult for the casual hobbyist to use. It also operates at a recommended voltage of 2.8 V, which can make interfacing difficult for microcontrollers operating at 3.3 V or 5 V. Our breakout board addresses these issues, making it easier to get started using the sensor, while keeping the overall size as small as possible.
PIN descriptions: VDD: Regulated 2.8 V output. Almost 150 mA is available to power external components (If you want to bypass the internal regulator, you can instead use this pin as a 2.8 V input with VIN disconnected).
VIN: This is the main 2.6 V to 5.5 V power supply connection. The SCL and SDA level shifters pull the I⊃۲;C lines high to this level.
GND: The ground (0 V) connection for your power supply. Your I⊃۲;C control source must also share a common ground with this board.
SDA: Level-shifted I⊃۲;C data line: HIGH is VIN, LOW is 0 V
SCL: Level-shifted I⊃۲;C clock line: HIGH is VIN, LOW is 0 V
XSHUT: This pin is an active-low shutdown input; the board pulls it up to VDD to enable the sensor by default. Driving this pin low puts the sensor into hardware standby. This input is not level-shifted.
کد آدرس گرفتن از تجهیز متصل به اردویینو از طریق پرتکل i2c :
در این حالت باید برنامه زیر را ران کرده وسپس برنامه serial monitor را اجرا کرد:
این برنامه در مدل دوم عکس به راحتی جوابگو خواهد بود :
// --------------------------------------
//http://playground.arduino.cc/Main/I2cScanner
// i2c_scanner
//
// Version 1
// This program (or code that looks like it)
// can be found in many places.
// For example on the Arduino.cc forum.
// The original author is not know.
// Version 2, Juni 2012, Using Arduino 1.0.1
// Adapted to be as simple as possible by Arduino.cc user Krodal
// Version 3, Feb 26 2013
// V3 by louarnold
// Version 4, March 3, 2013, Using Arduino 1.0.3
// by Arduino.cc user Krodal.
// Changes by louarnold removed.
// Scanning addresses changed from 0...127 to 1...119,
// according to the i2c scanner by Nick Gammon
// http://www.gammon.com.au/forum/?id=10896
// Version 5, March 28, 2013
// As version 4, but address scans now to 127.
// A sensor seems to use address 120.
// Version 6, November 27, 2015.
// Added waiting for the Leonardo serial communication.
//
//
// This sketch tests the standard 7-bit addresses
// Devices with higher bit address might not be seen properly.
// Watch Video explainign I2C address: https://www.youtube.com/watch?v=bqMMIbmYJS0
//
#include <Wire.h>
void setup()
{
Wire.begin();
Serial.begin(9600);
while (!Serial); // Leonardo: wait for serial monitor
Serial.println("I2C Scanner");
}
void loop()
{
byte error, address;
int nDevices;
Serial.println("Scanning...");
nDevices = 0;
for(address = 1; address < 127; address++ )
{
// The i2c_scanner uses the return value of
// the Write.endTransmisstion to see if
// a device did acknowledge to the address.
Wire.beginTransmission(address);
error = Wire.endTransmission();
if (error == 0)
{
Serial.print("I2C device found at address 0x");
if (address<16)
Serial.print("0");
Serial.print(address,HEX);
Serial.println(" !");
nDevices++;
}
else if (error==4)
{
Serial.print("Unknown error at address 0x");
if (address<16)
Serial.print("0");
Serial.println(address,HEX);
}
}
if (nDevices == 0)
Serial.println("No I2C devices found");
else
Serial.println("done");
delay(5000); // wait 5 seconds for next scan
}نتیجه بصورت زیر خواهد بود :
I2C device found at address 0x29 !
done
Scanning...
I2C device found at address 0x29 !
done
Scanning...
I2C device found at address 0x29 !
done
در مدل دوم ممکن است نتیجه این طور نباشد و ارور زیر را بدهد :بمنظور تغییر آدرس i2c می توان از کد زیر استفاده کرد :
/*
* Arduino sketch to update I2C address for GY-530 VL53L0X module
* Watch video instruction for this code: https://youtu.be/RRQASevYK3g
* Download this code from: http://robojax.com
*
* Written by Ahmad Shamshiri for Robojax.com on Dec 06, 2018
* in Ajax, Ontario, Canada
* Video Tutorial recorded Dec 06, 2018
*
* This code is "AS IS" without warranty or liability. Free to be used as long as you keep this note intact.*
* This code has been download from Robojax.com
This program is free software: you can redistribute it and/or modify
it under the terms of the GNU General Public License as published by
the Free Software Foundation, either version 3 of the License, or
(at your option) any later version.
This program is distributed in the hope that it will be useful,
but WITHOUT ANY WARRANTY; without even the implied warranty of
MERCHANTABILITY or FITNESS FOR A PARTICULAR PURPOSE. See the
GNU General Public License for more details.
You should have received a copy of the GNU General Public License
along with this program. If not, see <https://www.gnu.org/licenses/>.
*/
#include "Adafruit_VL53L0X.h"
Adafruit_VL53L0X lox = Adafruit_VL53L0X();
void setup() {
// Robojax.com I2C address update 20181206
lox.begin(0x2B);// put any address between 0x29 to 0x7F
}
void loop(){
}
نحوه دانلود کتابخانه :


در این حال با باز شدن پنجره سریال مانیتور باید باد ریت را روی 115200 تنظیم نمود
#include "Adafruit_VL53L0X.h"
Adafruit_VL53L0X lox = Adafruit_VL53L0X();
void setup() {
Serial.begin(115200);
// wait until serial port opens for native USB devices
while (! Serial) {
delay(1);
}
Serial.println("Adafruit VL53L0X test");
if (!lox.begin()) {
Serial.println(F("Failed to boot VL53L0X"));
while(1);
}
// power
Serial.println(F("VL53L0X API Simple Ranging example\n\n"));
}
void loop() {
VL53L0X_RangingMeasurementData_t measure;
Serial.print("Reading a measurement... ");
lox.rangingTest(&measure, false); // pass in 'true' to get debug data printout!
if (measure.RangeStatus != 4) { // phase failures have incorrect data
Serial.print("Distance (mm): "); Serial.println(measure.RangeMilliMeter);
} else {
Serial.println(" out of range ");
}
delay(100);
}
| /* This example shows how to get single-shot range measurements from the VL53L0X. The sensor can optionally be configured with different ranging profiles, as described in the VL53L0X API user manual, to get better performance for a certain application. This code is based on the four "SingleRanging" examples in the VL53L0X API. The range readings are in units of mm. */ #include <Wire.h> #include <VL53L0X.h> VL53L0X sensor; // Uncomment this line to use long range mode. This // increases the sensitivity of the sensor and extends its // potential range, but increases the likelihood of getting // an inaccurate reading because of reflections from objects // other than the intended target. It works best in dark // conditions. //#define LONG_RANGE // Uncomment ONE of these two lines to get // - higher speed at the cost of lower accuracy OR // - higher accuracy at the cost of lower speed //#define HIGH_SPEED //#define HIGH_ACCURACY void setup() { Serial.begin(9600); Wire.begin(); sensor.setTimeout(500); if (!sensor.init()) { Serial.println("Failed to detect and initialize sensor!"); while (1) {} } #if defined LONG_RANGE // lower the return signal rate limit (default is 0.25 MCPS) sensor.setSignalRateLimit(0.1); // increase laser pulse periods (defaults are 14 and 10 PCLKs) sensor.setVcselPulsePeriod(VL53L0X::VcselPeriodPreRange, 18); sensor.setVcselPulsePeriod(VL53L0X::VcselPeriodFinalRange, 14); #endif #if defined HIGH_SPEED // reduce timing budget to 20 ms (default is about 33 ms) sensor.setMeasurementTimingBudget(20000); #elif defined HIGH_ACCURACY // increase timing budget to 200 ms sensor.setMeasurementTimingBudget(200000); #endif } void loop() { Serial.print(sensor.readRangeSingleMillimeters()); if (sensor.timeoutOccurred()) { Serial.print(" TIMEOUT"); } Serial.println(); } |
| /* VL53L0X Distance Sensor modified on 26 oct 2020 by Amir Mohammad Shojaee @ Electropeak Home<iframe class="wp-embedded-content" sandbox="allow-scripts" security="restricted" style="position: absolute; clip: rect(1px, 1px, 1px, 1px);" title="“Home” — Electropeak" src="https://electropeak.com/learn/embed/#?secret=6MDwKb2EgU" data-secret="6MDwKb2EgU" width="600" height="338" frameborder="0" marginwidth="0" marginheight="0" scrolling="no"></iframe> Based on Adafruit Example */ #include "Adafruit_VL53L0X.h" Adafruit_VL53L0X lox = Adafruit_VL53L0X(); void setup() { Serial.begin(115200); // wait until serial port opens for native USB devices while (! Serial) { delay(1); } Serial.println(" VL53L0X test"); if (!lox.begin()) { Serial.println(F("Failed to boot VL53L0X")); while(1); } // power Serial.println(F("VL53L0X API Simple Ranging example\n\n")); } void loop() { VL53L0X_RangingMeasurementData_t measure; Serial.print("Reading a measurement... "); lox.rangingTest(&measure, false); // pass in 'true' to get debug data printout! if (measure.RangeStatus != 4) { // phase failures have incorrect data Serial.print("Distance (mm): "); Serial.println(measure.RangeMilliMeter); } else { Serial.println(" out of range "); } delay(1000); } |
حال در مدل سری اول که ادرس آن قابل قرایت نبود ، می توان از روش زیر استفاده نمود
پایه شماره 10 به rx
پایه شماره 11 به tx
Sample-Sketch for the VL53L0X Breakout
Connections:
Arduino -> Breakout
VCC VCC
GND GND
IO 10 TX
IO 11 RX
Default Baudrate is 9600
Copyright (c) 2017 GY & PLAY-ZONE GmbH http://www.play-zone.ch
Permission is hereby granted, free of charge, to any person obtaining a
copy of this software and associate documentation files (the "Software"),
to deal in the Software without restriction, including without limitation
the rights to use, copy, modify, merge, publish, distribute, sublicense,
and/or sell copies of the Software, and to permit persons to whom the
Software is furnished to do so, subject to the following conditions:
The above copyright notice and this permission notice shall be included
in all copies or substantial portions of the Software.
*************************************************************************/
#include <SoftwareSerial.h>
SoftwareSerial mySerial(10, 11); // RX, TX
unsigned char re_Buf[11], counter = 0;
unsigned char sign = 0;
byte data_Buf[3] = {0};
void setup() {
Serial.begin(9600);
mySerial.begin(9600);
mySerial.listen();
delay(10);
mySerial.write(0XA5);
mySerial.write(0X45); // Enable Output
mySerial.write(0XEA);
}
void loop() {
unsigned char i = 0, sum = 0;
uint16_t distance = 0;
while (mySerial.available()) {
re_Buf[counter] = (unsigned char)mySerial.read();
if (counter == 0 && re_Buf[0] != 0x5A) return;
counter++;
if (counter == 8) // Enough Data available?
{
counter = 0; // Get Ready for the next stream
sign = 1;
}
}
if (sign)
{
sign = 0;
for (i = 0; i < 7; i++)
sum += re_Buf[i];
if (sum == re_Buf[i] ) // Check Header
{
data_Buf[0] = re_Buf[4];
data_Buf[1] = re_Buf[5];
data_Buf[2] = re_Buf[6];
distance = data_Buf[0] << 8 | data_Buf[1];
Serial.print("distance: ");
Serial.print( distance/10);
Serial.print(" cm,mode: ");
Serial.println( data_Buf[2]);
} }
}
/***********************************************************************
در این حال با باز شدن پنجره سریال مانیتور باید باد ریت را روی 9600 تنظیم نمود
:نتیجه
distance: 8 cm,mode: 2
distance: 8 cm,mode: 2
distance: 7 cm,mode: 2
distance: 8 cm,mode: 2
distance: 7 cm,mode: 2
distance: 8 cm,mode: 2
distance: 7 cm,mode: 2
distance: 7 cm,mode: 2
distance: 8 cm,mode: 2
distance: 7 cm,mode: 2
distance: 7 cm,mode: 2
distance: 7 cm,mode: 2
distance: 7 cm,mode: 2
distance: 7 cm,mode: 2
distance: 7 cm,mode: 2
distance: 7 cm,mode: 2
distance: 8 cm,mode: 2
distance: 7 cm,mode: 2
distance: 7 cm,mode: 2
distance: 8 cm,mode: 2
distance: 7 cm,mode: 2
distance: 7 cm,mode: 2
distance: 7 cm,mode: 2
distance: 7 cm,mode: 2
distance: 7 cm,mode: 2
distance: 7 cm,mode: 2
distance: 8 cm,mode: 2
distance: 7 cm,mode: 2
distance: 7 cm,mode: 2
distance: 8 cm,mode: 2
distance: 7 cm,mode: 2
distance: 7 cm,mode: 2
distance: 8 cm,mode: 2
distance: 8 cm,mode: 2
distance: 7 cm,mode: 2
distance: 7 cm,mode: 2
distance: 7 cm,mode: 2
distance: 7 cm,mode: 2
distance: 8 cm,mode: 2
distance: 7 cm,mode: 2
distance: 7 cm,mode: 2
distance: 8 cm,mode: 2
distance: 8 cm,mode: 2
در حالتیکه از روش pwm بخواهیم انجام دهیم:نتیجه :
Sample-Sketch for the VL53L0X Breakout
Connections:
Arduino -> Breakout
VCC VCC
GND GND
IO 4 PWM
Default Baudrate is 9600
Copyright (c) 2017 GY & PLAY-ZONE GmbH http://www.play-zone.ch
Permission is hereby granted, free of charge, to any person obtaining a
copy of this software and associate documentation files (the "Software"),
to deal in the Software without restriction, including without limitation
the rights to use, copy, modify, merge, publish, distribute, sublicense,
and/or sell copies of the Software, and to permit persons to whom the
Software is furnished to do so, subject to the following conditions:
The above copyright notice and this permission notice shall be included
in all copies or substantial portions of the Software.
*************************************************************************/
int pin = 4;
unsigned long duration;
void setup() {
Serial.begin(9600);
pinMode(pin, INPUT);
delay(500);
}
void loop() {
uint16_t distance = 0;
duration = pulseIn(pin, HIGH);
distance = duration / 10;
Serial.print("distance: ");
Serial.print( distance);
Serial.print(" mm,time: ");
Serial.print( duration);
Serial.println("us"); }
delay(100);
/***********************************************************************
distance: 122 mm,time: 1224us
distance: 122 mm,time: 1224us
distance: 120 mm,time: 1207us
distance: 175 mm,time: 1757us
distance: 176 mm,time: 1764us
distance: 175 mm,time: 1758us
distance: 175 mm,time: 1758us
distance: 175 mm,time: 1758us
distance: 176 mm,time: 1761us
distance: 177 mm,time: 1777us
distance: 177 mm,time: 1778us
distance: 176 mm,time: 1764us
distance: 175 mm,time: 1757us
https://www.play-zone.ch/de/gy-vl53l0x-tof-distanzsensor.html
ویدیو مربوط به راه اندازی و رفع اشکال از این سنسور :