شبیه سازی های درایو های الکتریکی
در این وبلاگ می توانید شبیه سازی درایو های الکتریکی را دریافت نمایید
شبیه سازی های درایو های الکتریکی
در این وبلاگ می توانید شبیه سازی درایو های الکتریکی را دریافت نمایید74 : آموزش اطلاعات در مورد آیفون کوماکس
;مختصر اطلاعات ایفون کوماکس ، سوزوکی ، کامکس ، سیماران

آی سی MT2800n مربوط به تولید صدا دینگ دانگ این آیفون است که اگر خراب باشد آیفون کلا زنگ نمی زند

آی سی LM386 SMD برای تقویت صدای برد صوت آیفون تصویری استفاده می شود.
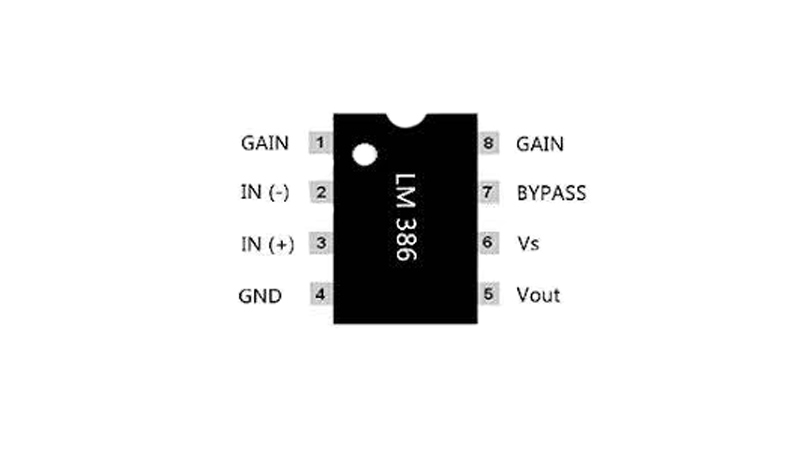 دیتا شیت آی سی LM386 :
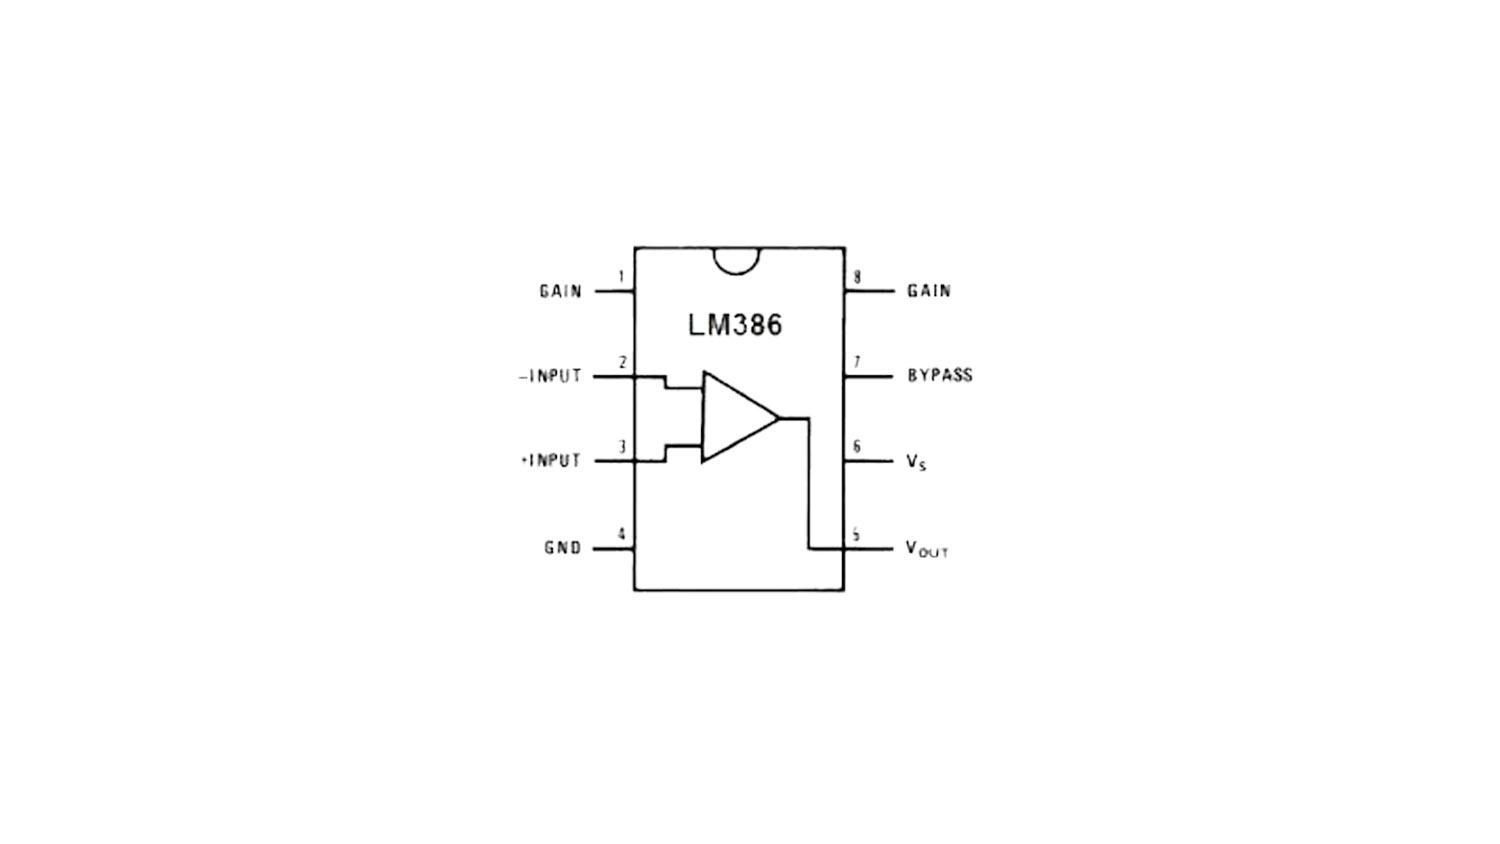
مشخصات آی سی LM386 SMD :
- دسته بندی محصولات : تقویت کننده ه صدا
- سری : LM386 محصول : تقویت کننده های صوتی
- کلاس : Class-AB
- توان خروجی : 325 مگاوات
- سبک نصب : SMD / SMT
- نوع : مونو 1 کاناله
- سته بندی / مورد : SOIC-8
- صدا – امپدانس بار : 4 اهم
- THD به علاوه سر و صدا : 0.2
- حداکثر ولتاژ تامین : 12 ولت
- حداقل ولتاژ تامین : 4 ولت
- حداقل دمای کار : 0 درجه سانتیگراد
- حداکثر دمای کار : + 70 درجه سانتیگراد
- ارتفاع بلندگو : 1.45 میلی متر
- نوع ورودی : آنالوگ
- طول : 4.9 میلی متر
- نوع تامین : تک کانال
- نوع خروجی : تک کانال تنها
- عرض : 3.9 میلی متر
- سود : 20 دسی بل
- تعداد کانال ها : 1 کانال
- IBجریان بایاس ورودی : 250 NA
- عامل جریان فعلی : 4 میلی آمپر
- ولتاژ منبع تغذیه : 5 ولت 9 ولت
- نوع سیگنال خروجی : تکPD
- لاتلاف انرژی : 730 مگاوات
- نوع محصول : تقویت کننده های صوتی PSRR نسبت رد
- منبع تغذیه : 50 دسی بل
نمونه مدار کوماکس و کامکس


73 : کتابخانه HC-05 , HC-06 ماژول بلوتوث در شبیه ساز پروتیوس PROTEUS
فایل های زیر را در مسیر
C:\Program Files (x86)\Labcenter Electronics\Proteus 8 Professional\DATA\LIBRARY
در ویندوز 10 قرار دهید ( ویندوز 64 بیت )
72 اطلاعات مهم در مورد فیوز ها :
Complete Guide to NH Fuses
What are NH Fuses?
NH fuses (also known as NH Knife Blade Fuses or DIN NH Blade Fuses) were defined in the German DIN standard 43620 around 1944. They were primarily designed as general purpose fuses for the protection of conductors. NH fuses are one-time fuses, meaning once they have blown, they must be replaced with a new fuse with the same characteristics.
NH Fuse Construction.
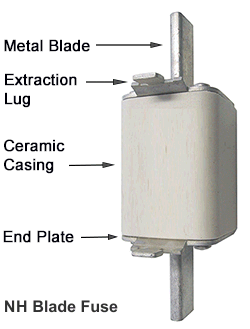
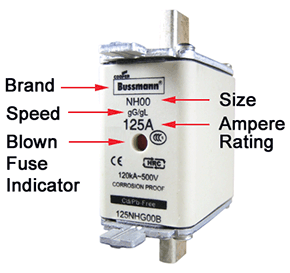
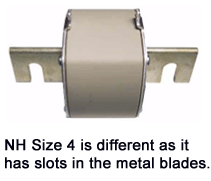
NH fuses are constructed from a rectangular ceramic casing enclosed by a cover plate that features a metal blade style terminal on each end. The fuse element inside the casing is connected to the cover plate / blade terminals. The majority of NH Fuses have a trip indicator to show if the fuse element has blown. Each cover plate includes a metal extraction lug that enables quick removal of the fuse from a holder when using the recomended NH fuse puller tool.
Where can I buy NH Fuses?
We stock a huge range of NH fuses to suit different applications.
Click on the application links below to see our product ranges. You can purchase online or contact our friendly sales staff for assistance.
|
Application |
Type |
NH Fuse Size |
Voltage |
|
gL / gG |
000 to 4a |
500VAC to 690VAC |
|
|
aM |
000 to 4a |
500VAC to 690VAC |
|
|
aR / gR |
000 to 3 |
690VAC |
|
|
aR / gR |
00 to 0 |
1000VAC |
|
|
gPV |
1 to 3 |
1000VDC |
|
|
gS |
000 to 3 |
440VDC to 550VDC |
|
|
- |
00 to 4a |
- |
NH Fuse Speeds.
NH Fuses have evolved over the years to suit a wide range of applications. Currently NH fuses are available in a wide range of element speeds. The element speed is usually printed on the fuse casing as one of the following markings;
|
aR, gR |
Protection of semiconductor devices, Very Fast Acting fuse. |
|
gL, gG |
General Purpose, Fast Acting fuse. |
|
aM |
Motor Protection, Slow Acting fuse. |
|
gPV |
Protection of solar photovoltaic arrays. |
|
gS |
Protection of Batteries. |
|
|
NH Fuse Sizes.
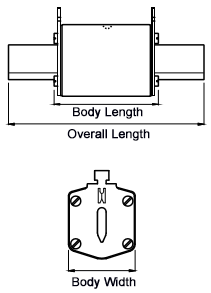
NH come in a variety of different sizes as you can see in the table below:
|
Size |
Body Type |
Overall |
Body |
Body |
|
NH 000 |
Standard |
79 |
53 |
21 |
|
NH 00C |
Compact |
79 |
53 |
21 |
|
NH 00 |
Standard |
79 |
53 |
28 |
|
NH 0 |
Standard |
125 |
68 |
28 |
|
NH 1C |
Compact |
135 |
68 |
28 |
|
NH 1 |
Standard |
135 |
72 |
46 |
|
NH 2C |
Compact |
150 |
72 |
46 |
|
NH 2 |
Standard |
150 |
72 |
54 |
|
NH 3C |
Compact |
150 |
72 |
54 |
|
NH 3 |
Standard |
150 |
72 |
65 |
|
NH 4 |
Standard |
200 |
75 |
100 |
|
NH 4a |
Standard |
200 |
75 |
95 |
Dimensions (in mm) are based on ETI fuse range and may vary between brands.
NH Fuse Extraction.
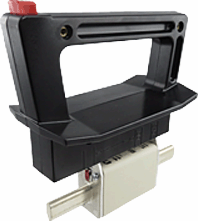
The safest and most simple way to remove an NH fuse from a holder is by using an NH Fuse Extractor. This tool ensures that you do not come into contact with any live parts. Without an extractor, NH fuses can be difficult to remove due to a tight fit between the clips of the holder and the metal fuse blades. Swe-Check sells an NH fuse extractor that is suitable for all removing all NH fuse sizes 000 to 4.
To remove a NH fuse using the extractor, you simply engage the fuse extractor onto the fuse extraction lugs, then pull the fuse out of the holder. When the fuse is removed, press the red button on top of the extractor and remove the fuse by sliding it off.
NH Fuse Holders.
There are 2 common types of NH fuse holder;
1. NH Fuse Base / NH Fuse Block.
2. NH Fuse Disconnect Switch.
منبع :
https://www.swe-check.com.au/editorials/nh_fuses.php
UTILISATION CATEGORIES
If you've ever had to replace a fuse, you may have realised that there's a few different fuse speeds. In simple terms, 'fuse speed' tends to refer to the time between the moment that an overcurrent begins and the moment the fuse arcs and opens the circuits.
Most fuses can be considered to be fast acting, however there are also slow acting varieties, also known as 'motor fuses', 'time delay', 'slow blow', 'delayed action', etc and semiconductor protection versions, also known as 'ultra-rapid', 'solid state', 'rectifier', etc.
When it comes to official classifications though, you may be surprised to know that fuses are not classified in terms of 'speed' but more in terms of 'range' and 'application'. All fuses that are covered by the IEC standard have an utilisation category, and when selecting fuses, it's very important to get this right.
Fuses are marked with symbols denoting their particular application or characteristic.
First Letter (lower case)
The first, lower-case letter indicates the breaking range of the fuse.
"g" stands for full-range breaking capacity, meaning that the fuse is capable of breaking all overcurrents from its minimum melting current up to its breaking capacity. These fuses can protect from overloads and short circuits. Full-range breaking capacity fuses can be used as sole protective devices.
"a" stands for partial-range breaking capacity, meaning that the fuse is capable of only breaking high currents of a multiple of its rated current. Partial-range breaking capacity fuses are designed for short-circuit protection only, and are therefore used in combination with other devices providing protection against overcurrents. They are also frequently used for back-up protection of other switching devices having a lower breaking capacity (e.g. contactors or circuit breakers).
Second Letter (upper case)
The second, upper-case letter indicates the characteristic. Refer below.
Current Utilisation Categories
|
Utilisation Category |
Application (Characteristic) |
|
gG |
Full range breaking capacity
fuse for general application, mainly |
|
aM |
Partial range breaking capacity fuse for the short circuit protection of motor circuits. |
|
gR |
Full range breaking capacity
fuse for the protection of |
|
gS |
Full range breaking capacity
fuse for the protection of |
|
aR |
Partial range breaking capacity
fuse for the short circuit |
|
gB |
Full range breaking capacity fuse for mining applications. |
|
gTr |
Full range breaking capacity
fuse for transformer protection, |
|
gM |
Full range breaking capacity
fuse for motor circuit |
|
gN |
North American general
application fuse, mainly for cable |
|
gD |
North American general
application time-delay fuse, mainly |
Former Utilisation Categories
|
Utilisation Category |
Application (Characteristic) |
|
gl |
Former IEC time-delay fuse, replaced by gG. |
|
gll |
Former IEC fast-acting fuse, replaced by gG. |
|
gL |
Former VDE fuse for conductor protectionm replaced by gG. |
|
gRL |
Manufacturer specific designation meanwhile standardised as gS. |
|
gGR |
Manufacturer specific designation meanwhile standardised as gS |
|
gT |
Former VDE time-delay fuse, replaced by gG |
|
gF |
Former VDE utilisation category, replaced by gG |
|
gTF |
Former VDE time-delay / fast-acting fuse, replaced by gB |
منبع :
https://www.fuseco.com.au/fuses/resources/articles/utilisation-categories
This is an extremely important figure in fuse specification. I2 is current squared whereas t is time. The figure shows how quickly the fuse reacts to different amounts of energy passing through it.
Or to put it another way, the I2t figure shows the amount of energy needed to operate the fuse. When you are specifying a fuse, you need to make sure that its I2t figure is smaller than the I2t of the equipment that it is protecting.

What are the differences between gFF, gG, gR, aM and aR fuses?
These letters all refer to the IEC international standard. They are all different types of fuses and relate to how they work.
What is the difference between 415 V a.c. and 690 V a.c. fuses?
415V volts tends to be the industry standard voltage in the UK, but there are some bigger installations that need a higher voltage, for example if there are very long cable runs.
It’s important to know what the voltage rating is for an installation because you should never use a fuse beyond its stated rating. So, you can use a 690V fuse for lower voltage applications such as 415V, but you must not use a 415V fuse for higher voltages. 690V fuses tend to be larger and more expensive than the 415V options.
What is the difference between DC and AC?
This describes the type of voltage and current flow in a circuit. In DC, or Direct Current, the current only flows in one direction and is “always on”. For example a dc circuit at 50V will remain at 50V continuously until switched off. With AC, or Alternating Current, on the other hand it changes direction many times per second, typically 50 times a second. This means that for alternating currents the voltage also reverses when it changes direction.
This is important because alternating current will pass though zero volts at some point. Ac is used for most applications and fuses generally have an a.c voltage rating. As the voltage and current pass through ero (typically 50 times a second) it is slightly easier for a fuse to break this voltage and current in a faulted circuit. When you try break the circuit of a DC current it will carry on flowing in the same direction as there is no zero point. It will try to continue to flow and is very difficult to break. D.c rated fuses are generally longer as they are designed to handle difficult d.c voltages and currents.

What does a time current curve show you?
This is a graph that plots time on the y axis against current on the x axis. The graph shows you the operating characteristics of the fuse - or put another way how quickly the fuse will operate at a given fault current. So, higher overload currents will result in the fuse links element melting or vaporising more quickly.
If you look at the graph then any operating conditions to the left of the curve leaves the fuse intact, but anything to the right means the fuse has operated.
منبع :

https://www.eaton.com/gb/en-gb/products/electrical-circuit-protection/fuses-and-fuse-
holders/fuses-technical-faqs.html
تصاویر مهم :


کاتالوگ های مهم
71 : آموزش برنامه نویسی اندروید بدون کد نویسی و ارتباط بلوتوثی با اردویینو
آردوینو، طراحی برنامه اندروید برای ارتباط بلوتوث با آردوینو بدون کد نویسی
https://www.aparat.com/v/f37t6zy
https://www.aparat.com/video/video/embed/videohash/f268165/vt/frame
67 : آموزش اطلاعات در مورد موتور برق ها
اطلاعات مربوط به موتور برق چینی با کیفیت:
شکل موج ولتاژ

شکل موج نیمه دامنه ولتاژ تولیدی

نیمه دوره تناوب


موتور برق ژاپنی با کیفیت:


برق شهر


جزوه 4 : دانلود فایل آموزشی ترانسفورماتور ها زبان اصلی
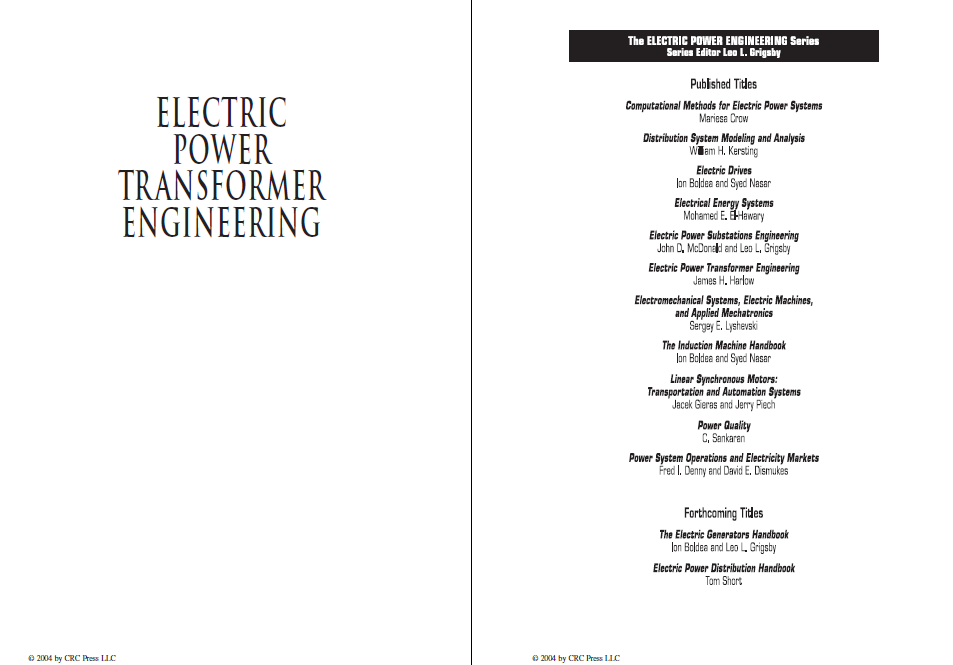
The ELECTRIC POWER ENGINEERING Series Saries Editor Leo L.. Grigsby
Published Titles
Computational Methods for Electric Power Systems
Mariesa Crow
Distribution System Modeling and Analysis
Wam H. Kersting
Electric Drives
Ion Boldea and Syed Nasar
Electrical Energy Systems
Mohamed E. E-Hewery
Electric Power Substations Engineering
John D. McDonald and Lea L. Grigsby
Electric Power Transformer Engineering
James H. Harlow
Electromechanical Systems, Electric Machines, and Applied Mechatronics
Sergey E. Lyshevsk
The Induction Machine Handbook
Ion Boldea and Syed Nasar
Linear Synchronous Motors: Transportation and Automation Systems
Jacek Geras and Jerry Plech
Power Quality
C. Sankaran
Power System Operations and Electricity Markets
Fred I. Denny and David E. Dismukes
Forthcoming Titles
The Electric Generators Handbook
Ion Boldea and Leo L. Grigsby
Electric Power Distribution Handbook
Tom Short
66 : آموزش حذف رمز فایل اکسل
فعال کردن نمایش پسوند فایل ها
در صورتی که پسوند فایل ها در سیستم شما نمایش داده نمیشه (پسوند همون حروفی هست که بعد از نقطه در ادامه اسم فایل قرار می گیره، بهش extension هم می گن.) باید اونها رو قابل نمایش کنید. برای این کار کافی هست:
- وارد control panel بشید. (می تونید کلمه control panel رو در سرچ ویندوز جستجو کنید)
- در قسمت سرچ کنترل پنل (بالا سمت راست) کلمه folder option رو جستجو کنید و مطالبق عکس زیر اونو انتخاب کنید.
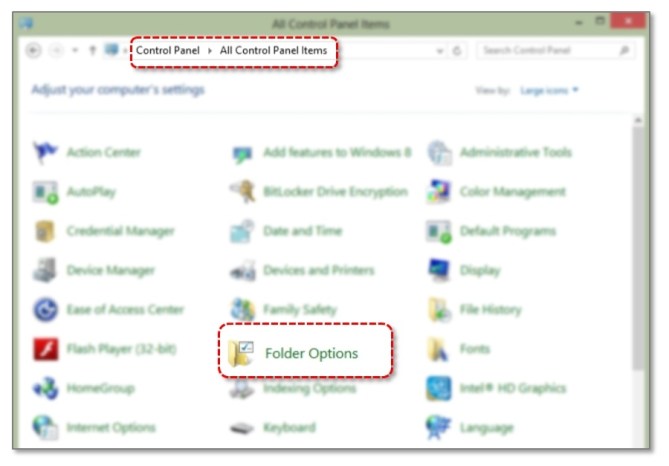
- مطابق عکس زیر از تب view تیک گزینه hidden extensions … رو بردارید و OK بزنید.
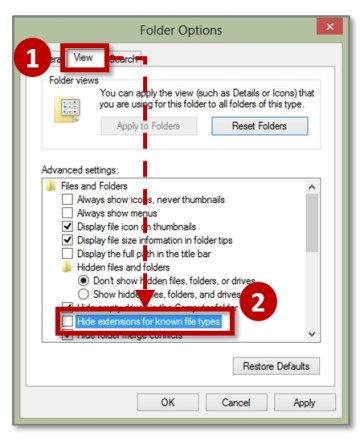
بعد از اینجام این کار در انتهای فایل های شما بعد از نام فایل پسوند یا فرمت اون نمایش داده میشه. مثلا فرمت های رایج اکسل به صورت xlsx یا xlsm هست.
2- تغییر پسوند فایل های به zip
دومین کاری که باید انجام بدید تغییر پسوند فایل ها از xlsx و xlsm به فرمت zip هست تا بتونید محتویات این فایل ها رو ببینید. برای اینکار روی فایل راست کلیک کنید و گزینه rename رو انتخاب کنید (می تونید از کلید F2 هم برای تغییر نام فایل ها استفاده کنید.). فرمت فایل رو از xlsx به zip تغییر بدید.
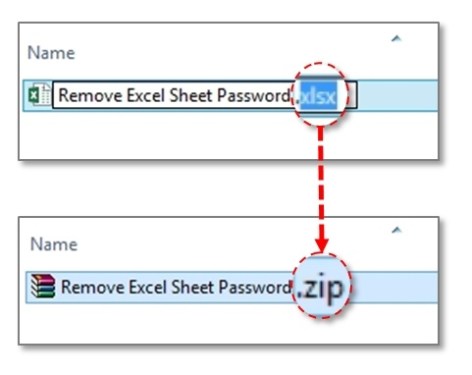
حالا خواهید دید که ایکون فایل شما به جای اکسل به نرم افزار winrar تغییر میکنه. (اگر نرم افزار winrar رو نصب ندارید، باید نصبش کنید.)
حالا کافی هست روی فایل دوبار کلیک کنید تا با نرم افزار winrar باز بشه. می تونید در اینجا محتویات فایل اکسل رو مشاهده کنید.
3- ایجاد کپی از شیت قفل شده اکسل در خارج از فایل zip
برای اینکه به شیت های اکسل دسترسی داشته باشید، مسیر زیر رو انتخاب کنید.
xl –> worksheets

در قسمت 3 عکس بر اساس تعداد شیت هایی که دارید فایل با فرمت xml می بینید. چون این فایل 2 شیت داشته پس دو فایل با فرمت xml مشاهده می کنید. کافیه که روی اسم شیت مورد نظر راست کلیک کنید و گزینه copy files to clip borad رو انتخاب کنید. توی هر کجای سیستم (مثلا Desktop یا هر جایی که دوست دارید) راست کلیک کنید و گزینه paste رو انتخاب کنید.
4-باز کردن فایل xml و حذف پسورد از شیت
حالا باید فایل شیت xml رو با بازش کنید. برای اینکار کافی هست روی اون راست کلیک کنید و از قسمت open with نرم افزار notepad رو انتخاب کنید. خواهید دید که فایل شما در این نرم افزار باز میشه.
ابتدای فایل کلیک کنید و کلید ctrl رو نگهدارید و کلید F رو بزنید. (Ctrl+F)
در پنجره باز شده در قسمت find کلمه sheetProtection رو جستوجو کنید. قسمت زیر رو از فایل حذف کنید.
<sheetProtection .... />
حتما دقت کنید مثل عکس زیر تا جایی که به /> می رسید رو انتخاب و حذف کنید.

بعد از حذف این قسمت فایل xml رو ذخیره کنید.
حالا باید این فایل رو به فایل زیپ برگردونید. برای اینکار دو راه دارید، 1- فایل رو انتخاب کنید و بکشیدش داخل فایل زیپ، 2- فایل رو کپی کنید و داخل فایل زیپ پیست کنید.
وقتی این کار انجام میدید از شما خواهد پرسید که میخواهید از فایل رو جایگزین فایل قبلی کنید، شما تایید کنید و OK بزنید.
5-تغییر پسوند فایل zip به پسوند اکسل
حالا که قسمت پسورد حذف کردید باید پسوند فایل zip رو به حالت اولیه برگردونید. فایل رو rename کنید، اگر پسوند اولیه فایل xlsx بود به xlsx تغییر بدید و اگر xlsm بود به xlsm تغییر بدید.
حالا دوباره ایکون اکسل کنار فایل ظاهر میشه و می تونید روی فایل دوبار کلیک کنید و با نرم افزار اکسل بازش کنید. تبریک میگم، دیگه نیازی به پسورد برای اصلاح شیت اکسل ندارید.پ
منبع :
https://skillpro.ir/%D9%86%D8%AD%D9%88%D9%87-%D8%A7%D8%B3%D8%AA%D9%81%D8%A7%D8%AF%D9%87-%D8%A7%D8%B2-%D9%BE%D8%B3%D9%88%D8%B1%D8%AF-%DB%8C%D8%A7-%D8%AD%D8%B0%D9%81-%D8%A2%D9%86-%D8%AF%D8%B1-%D8%A7%DA%A9%D8%B3%D9%84-2016/
بطور نمونه تعدادی از کد رمز های ذخیره شده در اکسل بصورت زیر است:
| کد وارد شده در اکسل | کد ذخیره شده در فایل notepad |
| کد ده دهی | کد رمزنگاری شده |
| 1 | CE28 |
| 2 | CE2E |
| 3 | CE2C |
| 4 | CE22 |
| 5 | CE20 |
| 6 | CE26 |
| 123 | CF7A |
64 : آموزش نحوه کار با دستگاه تستر باتری لیتیوم 18650
در این ویدیو شما با نحوه کار دستگاه تستر باتری لیتیوم 18650 آشنا می شوید
63 اثر کربن سوخته در کابل بر مقاومت عایقی سیستم
جهت تشخیص سلامت کابل لازمست ابتدا توسط اهم متر ( قسمت بیزر ) کابل مورد تست قرار گیرد لذا هیچ یک از رشته های کابل نباید با هم اتصالی داشته باشد و صدای بیزر شنیده شود
در صورتیکه کابل ها به هم راه ندهند و به زره کابل نیز متصل نباشند دوده در نقطه اتصالی ، می تواند خود رسانا باشد ولی در ولتاژ های بالا ( 220 به بالا ) این حالت رسانایی برای دوده معنا پیدا می کند و در ولتاژ های پایین ( ولتاژ اهم متر ) مقاومتی از خود نشان نمی دهد
لذا کابل باید توسط میگر هم تست شود
ولتاژ تست کابل های فشار ضعیف می تواند 500 یا 1000 ولت باشد ولی بهتر است با 500 ولت تست انجام شود
در ولتاژ تست 500 ولت مقاومت بین هر فاز اگر حدود 0.2 مگا اهم باشد یعنی دوده زده است
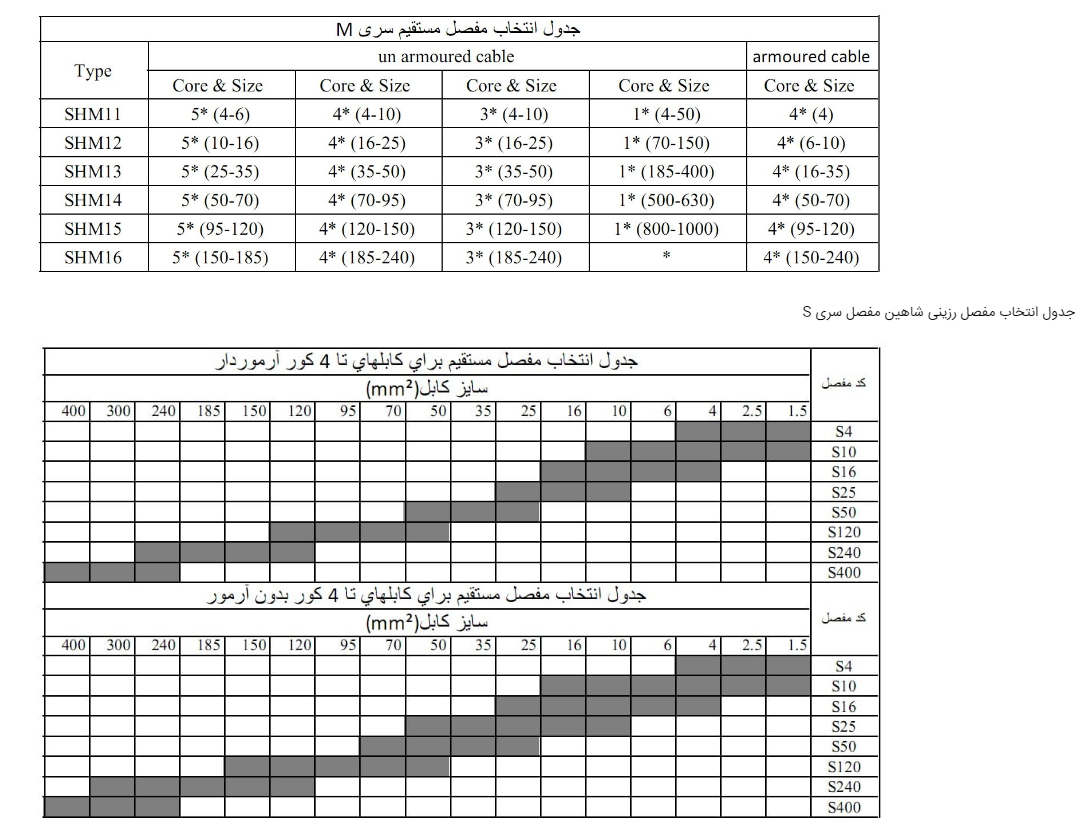
62 : تعیین سایز گلند و مفصل رزینی مورد نیاز جهت کابل
گلند جهت کابل بدون زره :
گلند جهت کابل زره دار :
مفصل :
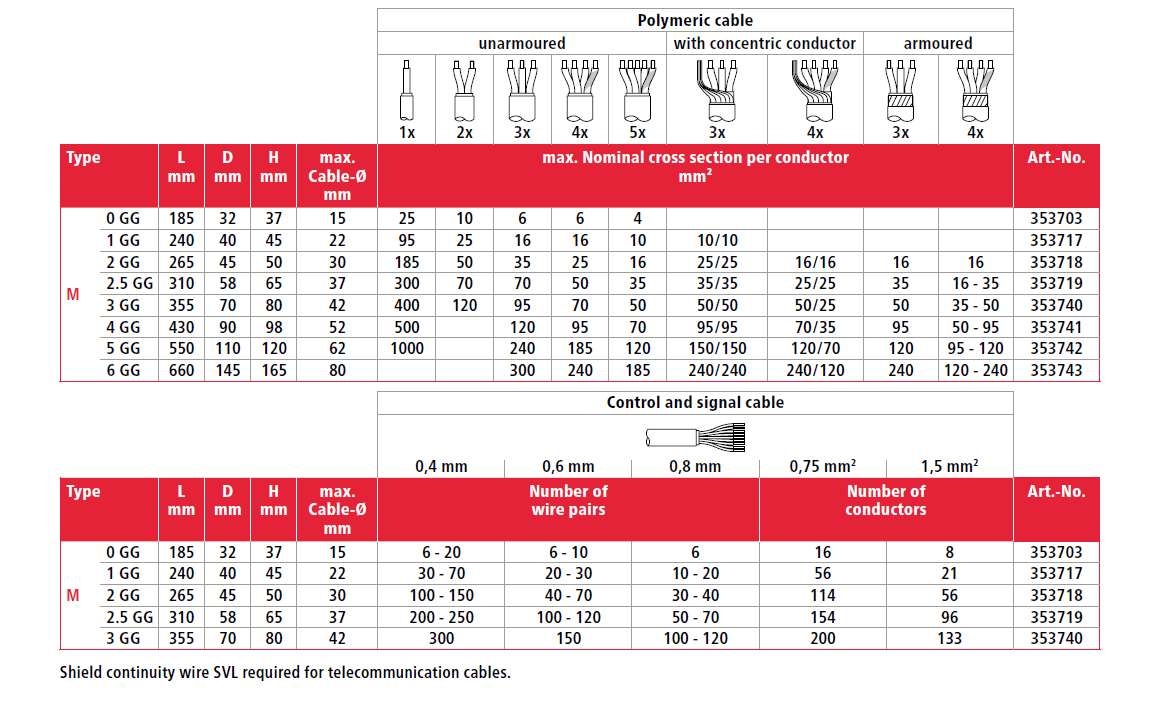
مفصل رزینی از شاهین مفصل :
61 : عیب یاب کابل زیر زمینی به روش TDR
بخشی از دستگاه های موجود در زمینه عیب یابی کابل به روش TDR
دستگاه چینی حدود قیمت 70 میلیون


دستگاه اروپایی حدود 140 میلیون


